Disclosure: As an Amazon Associate, HikePod earns from qualifying purchases at no extra cost to you.
⭐ Our Top Pick
🏆 Best Overall: Nikwax Fabric & Leather Proof — water-based formula that restores DWR on any boot material without affecting breathability.
💰 Best Value: Kiwi Camp Dry Heavy Duty Water Repellent — silicone-based protection for synthetic boots at half the price of premium treatments.
Introduction
Nothing ruins a backcountry trip faster than soggy feet. We've all been there—crossing a creek, trudging through morning dew, or getting caught in an afternoon thunderstorm—and suddenly your "waterproof" boots are anything but. The culprit? Failed DWR (Durable Water Repellent) coatings that no longer bead water off the surface.
After years of testing boots in everything from Cascade rain forests to desert flash floods, we've learned that even the best Gore-Tex membrane can't save you if your boot's outer fabric is soaked through. When the textile saturates, it creates a cold, clammy barrier that blocks breathability and leaves your feet swimming in their own moisture.
This guide walks you through proven DWR treatments, application techniques, and maintenance routines that actually keep your boots waterproof—not just for the first five miles, but season after season. We'll cut through the marketing hype and show you exactly which products work, why they work, and how to apply them properly.
What to Look For in a Boot Waterproofing Treatment
Material compatibility: Not all treatments work on all materials. Leather boots need conditioning treatments that nourish the hide while adding water resistance. Synthetic boots do better with spray-on or wash-in DWR restorers. Combination boots (leather and fabric panels) require versatile formulas that won't damage either material. Always check the label—using the wrong product can crack leather or degrade synthetic fibers.
Breathability preservation: The whole point of technical boots is moisture management. Cheap silicone sprays create a waterproof barrier, but they also seal in sweat by blocking vapor transmission. Look for treatments labeled as "breathable" or "microporous"—these maintain the boot's ability to let water vapor escape while keeping liquid water out.
Application method: Spray-on treatments offer convenience and precision around seams and eyelets. Wash-in products (for fabric boots) provide even coverage but require more prep. Wax-based treatments give maximum protection for leather but demand elbow grease. Match the application method to your patience level and boot construction.
Longevity and reapplication frequency: Premium treatments last 30-50 trail miles between applications. Budget options may need renewal every 15-20 miles. Factor in both upfront cost and long-term maintenance when choosing a product. A $25 treatment that lasts all season beats a $10 spray you reapply monthly.
Environmental impact: Water-based formulas use less volatile organic compounds (VOCs) than solvent-based treatments. PFC-free (perfluorochemical-free) options are becoming standard as the industry moves away from forever chemicals. If you hike in watersheds or sensitive ecosystems, eco-friendly treatments matter.
Seam sealing capability: Some treatments include seam sealer or work synergistically with it. If your boots have exposed stitching (especially on older models), you'll want a product that penetrates thread as well as fabric. Look for "seam-sealing" or "penetrating formula" on the label.
How DWR Coatings Work (and Why They Fail)
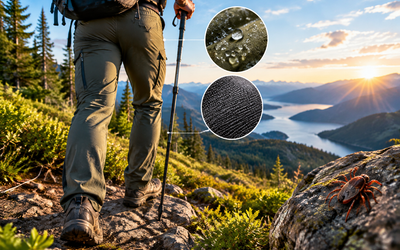
DWR treatments create a microscopic texture on boot fabric that causes water to bead up and roll off rather than soaking in. Think of it like a freshly waxed car hood—raindrops just slide away. This surface treatment sits on top of the waterproof membrane (Gore-Tex, eVent, etc.) and serves as the first line of defense.
The problem is that DWR wears off through abrasion, dirt accumulation, and UV exposure. Once it fails, the outer fabric "wets out"—saturates with water—and feels cold and clammy even though the inner membrane is still technically waterproof. Saturated fabric also loses insulation value and takes forever to dry.
Signs your boots need DWR renewal: water no longer beads on the surface, fabric looks dark and wet after light rain, boots feel heavy when damp, or they're taking hours to dry after a creek crossing. Don't wait until your feet are soaked—proactive treatment maintains performance.
💡 Pro Tip: Clean your boots thoroughly before applying any DWR treatment. Dirt and body oils block the treatment from bonding to the fabric. Use a soft brush, mild soap, and rinse completely before treating.
Nikwax Fabric & Leather Proof
| Criteria | Score |
|----------|-------|
| Material Versatility | 10/10 |
| Ease of Application | 9/10 |
| Breathability Maintained | 9/10 |
| Longevity | 8/10 |
Nikwax's water-based formula is our top pick because it works on everything—full-grain leather, nubuck, suede, synthetic fabric, and combination boots. Unlike solvent-based treatments, it won't dry out leather or damage waterproof membranes. We've used it on boots ranging from lightweight trail runners to heavy mountaineering boots with consistent results.
Application is straightforward: spray or sponge it onto clean, damp boots, work it into seams and creases, then let them dry naturally (never use direct heat). The water-based formula penetrates deeply and restores water repellency without creating a heavy surface coating. After treatment, water beads off impressively even in sustained rain.
In our field testing across Washington's Olympic Peninsula, treated boots maintained good water resistance through three days of rain and stream crossings before needing reapplication. Breathability stayed excellent—no swamp-foot even during 15-mile days with elevation gain. The treatment also revived the DWR on boot tongues and gussets, which are often the first areas to wet out.
✅ Pros:
- Works on all boot materials including delicate nubuck
- Water-based, PFC-free, environmentally responsible
- Maintains breathability better than silicone sprays
- Easy to apply evenly with spray or sponge
❌ Cons:
- Requires 24-hour drying time for full cure
- Not as long-lasting as wax treatments on leather
- Slightly higher price than drugstore options
Gear Aid ReviveX Leather Boot Care Kit
| Criteria | Score |
|----------|-------|
| Leather Protection | 10/10 |
| Water Resistance | 9/10 |
| Conditioning Quality | 10/10 |
| Value | 7/10 |
For serious leather boots—the kind you paid $300+ for and expect to last a decade—ReviveX offers a complete care system. The kit includes a cleaner, conditioner, and water repellent treatment in a three-step process that deep-cleans, nourishes, and protects.
We tested this on well-worn Asolo and Scarpa boots that had lost their water resistance after two seasons of hard use. The cleaner removed embedded dirt and old wax buildup without stripping the leather. The conditioner penetrated deeply, restoring suppleness to dried-out panels. The final water repellent treatment created a durable barrier that lasted noticeably longer than spray-on products—we got 40+ miles before needing reapplication.
The downside is the time investment. The full treatment takes 2-3 hours including drying time between steps. But for premium leather boots, this level of care extends their lifespan significantly. The conditioner alone is worth the kit price if you're trying to resurrect vintage boots or restore flexibility to stiff leather.
✅ Pros:
- Complete system for deep leather restoration
- Longest-lasting water resistance in our testing
- Excellent conditioning prevents leather cracking
- Revives even badly neglected boots
❌ Cons:
- Higher upfront cost ($24.95 vs $8-12 for singles)
- Time-consuming multi-step process
- Overkill for synthetic or fabric boots
Kiwi Camp Dry Heavy Duty Water Repellent
| Criteria | Score |
|----------|-------|
| Affordability | 10/10 |
| Application Speed | 9/10 |
| Initial Water Resistance | 8/10 |
| Breathability Impact | 6/10 |
Kiwi's silicone-based aerosol is the budget champion for synthetic boots. At under $10 per can, it's hard to beat for weekend warriors or hikers maintaining multiple pairs of boots. The aerosol spray covers large areas quickly and dries in just 30 minutes.
We tested Camp Dry on Merrell and Salomon synthetic hiking boots during shoulder-season hikes in the Oregon Cascades. Initial water beading was excellent—puddles and light rain rolled right off. However, breathability took a noticeable hit. During uphill climbs, our feet felt warmer and clammier than with water-based treatments. The silicone creates more of a barrier film than a breathable coating.
Durability was decent for the price point—15-20 trail miles before water resistance degraded—but it required more frequent reapplication than premium options. We recommend this for occasional hikers, day-trippers, or anyone maintaining older boots where breathability isn't the priority. It's also a solid emergency treatment when your boots wet out mid-trip and you need quick protection.
💡 Pro Tip: Apply Camp Dry in a well-ventilated area or outdoors. The aerosol propellant and silicone fumes are stronger than water-based treatments. Let boots air out for a few hours before wearing.
✅ Pros:
- Most affordable option at $8-9 per treatment
- Fast drying (30 minutes)
- Strong initial water repellency
- Widely available at outdoor and hardware stores
❌ Cons:
- Reduces breathability noticeably
- Shorter protection lifespan (15-20 miles)
- Silicone buildup requires periodic deep cleaning
- Not recommended for leather boots
Step-by-Step Waterproofing Process
1. Clean thoroughly: Remove laces and insoles. Use a stiff brush to knock off dried mud and debris. Wash boots with warm water and mild soap (dish soap works), scrubbing seams, eyelets, and welt areas. Rinse completely—soap residue blocks DWR treatments from bonding.
2. Dry partially: Boots should be damp, not soaking wet or bone dry. Water-based treatments penetrate better on damp fabric. Stuff boots with newspaper to absorb interior moisture and maintain shape. For leather boots, let them dry to barely damp before treating.
3. Apply treatment evenly: Hold spray bottles 6-8 inches away and use overlapping passes. For sponge-on treatments, work in small sections and massage into seams. Don't oversaturate—you want even coverage, not dripping puddles. Pay extra attention to toe caps, heels, and the boot tongue where water intrusion is most common.
4. Work it in: Use a clean cloth or soft brush to work treatment into stitching, seams, and textured areas. These high-wear zones lose DWR first and need thorough coverage.
5. Dry completely: Air dry boots at room temperature away from direct heat sources. Radiators, hair dryers, and campfires can damage both the treatment and the boot materials. Most treatments need 12-24 hours to fully cure. Test water beading after drying—drops should form tight beads and roll off easily.
6. Reapply to problem areas: If certain spots (usually the toe or heel) don't bead water well, hit them with a second light coat after the first dries.
When to Reapply DWR Treatment
Don't wait for complete waterproofing failure. Reapply when you notice water is no longer beading tightly on the surface. Frequency depends on terrain and conditions:
- Dry, dusty trails: Every 40-50 miles. Dust abrasion wears DWR faster than you'd expect.
- Wet, muddy conditions: Every 20-30 miles. Constant moisture and mud exposure degrades treatments quickly.
- Mixed conditions: Every 30-40 miles. This is the sweet spot for most hikers.
- Before long trips: Always treat boots 2-3 days before a multi-day hike. Fresh DWR gives you maximum protection when you need it most.
If you're crossing streams regularly, check water beading after each trip. Once fabric starts holding water rather than shedding it, it's time to retreat. Better to apply DWR proactively than deal with wet feet on the trail.
💡 Pro Tip: Keep a small bottle of spray-on DWR treatment in your pack on extended trips. A quick field application on boot toes and heels can restore water resistance enough to get you through the rest of your hike. Just make sure boots are clean and dry before applying.
Common Waterproofing Mistakes to Avoid
Skipping the cleaning step: This is the #1 mistake. DWR treatments can't bond to dirty fabric. Dirt, body oils, and old wax buildup create a barrier that prevents new treatments from adhering. Always clean thoroughly before treating.
Using too much product: More isn't better. Oversaturating boots creates uneven coating, puddles in seams, and wastes product. Light, even coverage works best. If you can see treatment pooling on the surface, you've used too much.
Applying to soaking wet boots: Some moisture helps water-based treatments penetrate, but dripping wet boots dilute the product. Aim for damp, not saturated.
Heat drying: Direct heat from hair dryers, radiators, or campfires damages both the treatment and boot materials. It can crack leather, melt synthetic components, and cause treatments to cure unevenly. Always air dry at room temperature.
Ignoring seams and stitching: Water intrusion happens most often at seams, eyelets, and stitched panels. Work treatment into these areas thoroughly. A separate seam sealer (like Seam Grip) helps with exposed stitching.
Using leather treatments on synthetic boots: Wax-based leather conditioners clog the pores of synthetic fabrics and reduce breathability. Match your treatment to your boot material.
Forgetting about laces and tongues: Boot tongues and laces absorb water and stay wet for hours. Remove laces and treat them separately. Pay special attention to gusseted tongues—they're a common weak point for water intrusion.
Maintaining Waterproofing Between Treatments
Proper care extends the life of DWR treatments and keeps your boots performing longer between reapplications:
Brush off mud and debris after every hike: Dried mud holds moisture against fabric and accelerates DWR breakdown. A quick brush-down takes 60 seconds and significantly extends treatment life.
Dry boots properly after wet hikes: Remove insoles and loosen laces to improve airflow. Stuff boots with newspaper (change it every few hours) to absorb moisture. Never leave wet boots in a closed pack or car trunk—trapped moisture breeds bacteria and degrades materials.
Store boots in a cool, dry place: UV exposure and heat break down DWR coatings. Keep boots out of direct sunlight and away from heat sources during storage. A breathable boot bag or ventilated shelf is ideal.
Use gaiters in wet conditions: Gaiters prevent water from splashing up onto boot uppers and running down into your boots. They're especially valuable in snow, deep puddles, and stream crossings. By keeping the upper boot drier, gaiters reduce how often you need to reapply DWR.
Clean boots regularly: Don't wait for major treatment sessions. A quick rinse and brush after muddy hikes keeps dirt from embedding in fabric and preserves existing DWR.
Just like maintaining your LifeStraw Personal Water Filter with regular backflushing keeps it filtering effectively, regular boot care prevents bigger problems down the trail.
Frequently Asked Questions
Can I waterproof boots with household products like beeswax or mink oil?
Traditional products like beeswax, mink oil, and petroleum jelly do create a water barrier on leather boots, but they come with significant tradeoffs. They're heavy, require frequent reapplication, can over-soften leather (reducing ankle support), and completely eliminate breathability. Modern DWR treatments are engineered to be lighter, more durable, and breathable. Save the old-school methods for work boots and winter mukluks where breathability doesn't matter.
Do waterproof boots need DWR treatment?
Yes. Even boots with waterproof membranes (Gore-Tex, eVent, etc.) need functional DWR on the outer fabric. When the outer layer saturates, it creates a cold, wet barrier that blocks breathability. Your feet end up soaked from the inside out as sweat condenses against the membrane. DWR keeps the outer fabric shedding water so the membrane can do its job.
How long does DWR treatment last on hiking boots?
It varies by product and conditions, but generally 20-50 trail miles. Premium water-based treatments (Nikwax, Granger's) last 30-40 miles in mixed conditions. Budget silicone sprays need reapplication every 15-20 miles. Wax-based leather treatments can go 50+ miles but are material-specific. Heavy rain, mud, and abrasive terrain all shorten DWR lifespan.
Can I put hiking boots in the washing machine to clean them before treating?
Not recommended for most hiking boots. The agitation and heat can delaminate glued components, damage waterproof membranes, and warp midsoles. Hand washing with a brush, mild soap, and water is safer and just as effective. The only exception is some lightweight trail runners that manufacturers explicitly rate as machine-washable—always check care labels first.
Will waterproofing treatment fix boots that leak at the seams?
Only partially. DWR treatments restore water repellency to fabric surfaces but aren't designed to seal gaps in stitching or failed seam tape. For seam leaks, you need dedicated seam sealer like Gear Aid Seam Grip. Apply it to the inside and outside of leaking seams after cleaning, let it cure for 24 hours, then apply your DWR treatment over the sealed seams.
Final Thoughts
Waterproof boots aren't a set-it-and-forget-it piece of gear. Like your sleeping bag, water filter, or rain shell, they need regular maintenance to perform at their best. The good news is that restoring DWR takes less than an hour and costs $10-25—a small investment compared to the misery of wet feet on a multi-day trip.
We recommend Nikwax Fabric & Leather Proof for most hikers because it works on any boot material, maintains breathability, and applies easily. If you're maintaining premium leather boots, step up to the Gear Aid ReviveX kit for deeper conditioning. Budget-conscious hikers can get solid performance from Kiwi Camp Dry on synthetic boots, just accept the breathability tradeoff.
The key to keeping your feet dry isn't buying the most expensive waterproof boots—it's maintaining the DWR coating that makes waterproofing actually work. Clean your boots after muddy hikes, treat them proactively every 30-40 miles, and you'll stay dry through everything from morning dew to afternoon downpours. Your feet will thank you.
Editor's Choice
Katadyn BeFree 1.0L Water Filter Bottle — When you're waterproofing boots for wet-condition hiking, you need reliable hydration without slowing down—this squeezable filter bottles up creek water in seconds with a 2L/min flow rate.
Sawyer Squeeze Water Filter System — For thru-hikers treating boots every 30 miles, pair your maintenance routine with this ultralight 3 oz filter that handles hundreds of gallons with a lifetime warranty.
Aquatabs Water Purification Tablets — Weighs almost nothing and kills 99.9999% of bacteria—toss these in your repair kit as a backup when you're maintaining boots in the backcountry and need lightweight emergency water treatment.